how to - turn headband /ear warmer stretchy + cover elastic - crochet tutorial
I had some yarn remaining from a previous project so I decided to work a headband with it using the bubble stitch BUT unfortunately it was not enough and the stitched themselves were not also stretchy as I wished them to be so I sewed an elastic to the ends of the headband and covered it by yarn
Diagonal weave stitch would make a relatively bulky project. Here, I used a thin yarn to make a scarf for my 2 years old nephew. At the beginning, I thought that the scarf would wrinkle but it came out pretty well.
This pattern is formed of multiples of 5 of both front post and back post double crochet, plus two double crochet stitches; one on each side of the each row
Row 1: insert your hook into 2nd chain from the hook and Dc (to avoid the ch3 gap). Dc till the end of the row.
Row 2: dc into the 1st stitch, * fpdc in the next 3 stitches in the row, Bpdc in the next 2 stitches* to complete your first set. Repeat between * till the end, dc the last stitch. Turn.
Row 3: dc into the 1st stitch, * fpdc in the next stitch, Bpdc in the next 3 stitches, fbdc in the next stitch* to complete your first set. Repeat between * till the end, dc the last stitch. Turn.
Row 4: dc into the 1st stitch, * Bpdc in the next 2 stitches, fpdc in the next 3 stitches in the row * to complete your first set. Repeat between * till the end, dc the last stitch. Turn.
Row 5: dc into the 1st stitch, * Bpdc in the next 2 stitches, fpdc in the next 2 stitches, bpdc in the next stitch * to complete your first set. Repeat between * till the end, dc the last stitch. Turn.
Row 6: dc into the 1st stitch, * fpdc in the next 2 stitches, Bpdc in the next 2 stitches, fpdc in the next stitch* to complete your first set. Repeat between * till the end, dc the last stitch. Turn.
Row 7: dc into the 1st stitch, * fpdc in the next 2 stitches, Bpdc in the next 3 stitches* to complete your first set. Repeat between * till the end, dc the last stitch. Turn.
Row 8: dc into the 1st stitch, * bpdc in the next stitch, fpdc in the next 3 stitches, bpdc in the next stitch* to complete your first set. Repeat between * till the end, dc the last stitch. Turn.
Row 9: dc into the 1st stitch, * bpdc in the next 3 stitches, fpdc in the next 2 stitches * to complete your first set. Repeat between * till the end, dc the last stitch. Turn.
Row 10: dc into the 1st stitch, * fpdc in the next stitch, Bpdc in the next 2 stitches, fpdc in the next 2 stitches* to complete your first set. Repeat between * till the end, dc the last stitch. Turn.
Row 11: dc into the 1st stitch, * bpdc in the next stitch, fpdc in the next 2 stitches, bpdc in the next 2 stitches* to complete your first set. Repeat between * till the end, dc the last stitch. Turn.
Repeat from rows (2 – 11) till you finish you work.
I've also made a video tutorial for the pattern:
If you have any questions leave a comment below or on the youtube video
A couple of weeks ago, I spotted this beautiful crochet bag of Dolce & Gabbana on Pinterest. It has been on my mind since then. The sew-on crystals have added an extra elegance.
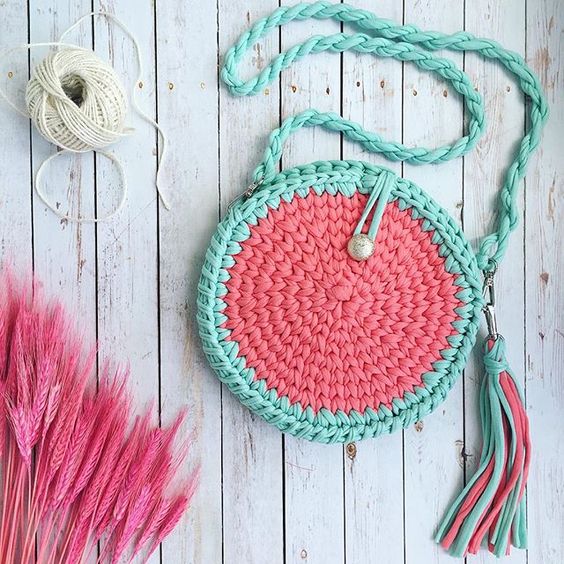
In my opinion, crochet rounded bags are best worked in t-shirt yarn and I think they would be useful this summer for anyone who is not a great fan of large bags like me. 😆
these are some photos I found of bags that are worked great with t-shirt yarn.they look simple and chic. I personally preferred the one with tassels. I would definitely give them a try!
This summer I've decided to go for embroidery as my new hobby and since I'm a HUGE lover of blossom trees, I've chosen them to be my inspiration for my very first embroidery project.
I've used brown and pink cotton thread. The process took too much time than I expected. About 4 days (not full-time of course). However, considering that I am a beginner, the results came out great!


